Wednesday, September 16, 2009

Connecting to NXT on Windows 7 64 bit

For many reasons, it has been quite a long time since I last played with the NXT. At one point I was actually trying to sell mine as well as someone elses, because I just don't have too much time these days. However, because I once said I would write a library in C#.NET I had a bit of a look to see how far I'd actually gotten with it for old times sake. I tried to get all the software up and running, but because I was running Windows 7 RC x64 I had all sorts of problems. Hopefully this guide will help others using Windows 7 (or even Vista x64) in the future.

In this guide I will basically run through the steps of how to get the LEGO NXT software installed and how to connect the NXT brick to a PC running a 64 bit version of Windows 7. I will run through both getting the USB cable working as well as communicating through Bluetooth. A Bluetooth connection will basically appear as a number of Serial COM ports in the Bluetooth device settings. I can't give you support for other libraries and toolkits such as Microsoft Robotics Studio, leJOS, RobotC, etc... I simply haven't used them before!

0. My test system

Windows 7 Ultimate x64 build 7100
NIMBUS USB Bluetooth Dongle

LEGO NXT with USB cable

1. Delete any existing LEGO NXT Software, Drivers and Language Packs

Go to your Programs and Features in your Control Panel and remove any existing LEGO NXT software, NXT drivers and language packs. At this stage you shouldn't have Bluetooth or USB connected to your PC.

2. Prepare Software

First of all we will get all the files that we need in order to get everything working. 


The first thing you will need are some 64 bit drivers for the NXT USB cable. Go to the RobotC download website at http://www.robotc.net/content/lego_down/lego_down.html and download the "NXT - 64 bit operating system" zip file called "NXT_64bit_driver.zip".

The other thing you will need is a copy of the LEGO NXT CD. If you only want to get the USB cable working but you do not want to use the NXT-G Software that comes with the NXT you do not need the CD.

3. Install the NXT 64 bit Driver

Open up the
"NXT_64bit_driver.zip" file you just downloaded and run the "LegoMindstormsNXTdriver64.msi" that is inside it. Follow the prompts with default settings and default installation path.

If you now turn on your NXT brick and plug the USB cable into it and into the PC you should see Windows 7 trying to install the correct drivers. Once completed you should get the following message:


If you have a look in the Device Manager (in Control Panel > System) you should see the newly installed LEGO MINDSTORMS NXT item.


Make sure that the NXT is actually turned ON, because it does tend to switch itself off automatically without you noticing. 

If this did not work for you then all I can suggest is that you make sure all previous drivers and anything you have done up to this point is deleted and you start again. Note that the driver I am using here is only for 64 bit systems. The RobotC website also has a 32 bit driver you can try if needed if your system is a 32 bit system.

4. Install the LEGO NXT Software

You now obviously want to try to use the software that comes with the NXT to develop some programs or maybe you only need it to update the firmware and then you will use some other 3rd party library. In any case this is what you need to do to get it going. 

From experience I noticed that you can't just stick in the CD and run the auto launch setup, because it will appear to load but in reality it will only install the NXT Driver (which doesn't work anyway). You can see in the picture below that only the driver is in the list to be installed so something is definitely fishy!


Cancel out of any setup programs that may have already started. We do not want to take the standard route.

To get things going we will install two things manually, which would normally be taken care of by the autorun installer:
  • NXT Software (the actual development tool that will let you build NXT apps)
  • LEGO Mindstorms Language Pack
Open up the CD and go into Bin\LEGO MINDSTORMS NXT Software\NXT_LEGO_MS. Run the "Mindstorms.msi" file to being setup. Just follow the prompts and install the files to the default location. At the end of the setup process you may get an error message as follows:


As long as you have flash installed you should be fine. Just click OK and the installer will finish. 
Now navigate to Bin\Products\LEGO MINDSTORMS - English\LEGO_Eng on the CD. Run the "MidstormsEng.msi" file to start the installer. On the first screen click Next. I'm not sure what you will see now, but I can see that it is trying to install the files into G: drive:


This is wrong so we need to change this to the correct path. Click on Browse and navigate to "C:\Program Files (x86)\LEGO Software\". Your path should now point to the given directory:


You can now click Next and follow the remaining prompts to finish the installation. 

There is actually one more thing that you could install, but it is not necessary. The Meta Uninstaller program is simply a program that allows you to uninstall the LEGO software more easily and all at once. You can however just uninstall LEGO software at a later stage without having to use this program.

If everything was successful you should have the Minstorms logo on your desktop and in your start menu folder. The Programs and Features in the Control Panel should have these programs listed:


You can now launch the LEGO software by clicking on the Mindstorms shortcut on the desktop or start menu. If your installation was successful the Mindstorms software will start with no issues.

5. Test your USB Driver

To check that the USB cable driver that you installed earlier works fine you can either try to update the NXT Brick with the latest 1.05 firmware (available on the LEGO support website) or make a small sample program and try to load it. These steps will not be outline here as there is sufficient documentation and help available from LEGO.

6. Test Bluetooth

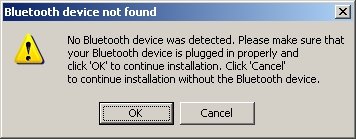
The final step in this guide is to ensure that Bluetooth is working as expected. When you plug in a USB Bluetooth dongle or use built in Bluetooth you should already have some icons showing up in your Device Manager. You should see something like this:


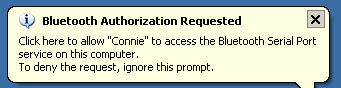
Make sure that your NXT Brick is powered up and Bluetooth has been enabled. In the Bluetooth menu you can use the search menu to scan for computers. Assuming your PC's Bluetooth adapter is up and running your NXT Brick should be able to locate it. If at any stage your NXT Brick/PC asks for a PIN just enter 1234 as a default in both the NXT Brick and the PC.

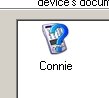
If the NXT Brick was successfully detected and installed as a device you should be able to see it in the Bluetooth devices window of your PC. Something similar to below:


Looking at the properties of the device and clicking on the Hardware tab should give you two serial ports. These are the serial ports (COM Ports) that you will be able to connect to using your own custom software. They are literally just seen as standard serial ports and will automatically transfer over Bluetooth. As follows:


The only difference is that your port numbers may not be exactly the same.

7. Final Remarks

Hopefully you should now have USB capabilities to be able to load your software onto the NXT Brick using the Mindstorms development software. If you wish to use a custom programming language or library you can also make use of the Bluetooth serial ports.

If you ever wish to uninstall the LEGO software it is a simple matter of going into your Programs and Features section of the Control Panel and uninstalling all LEGO NXT items.

Tuesday, October 03, 2006

Bluetooth, NXT, Robotics Studio

I promised in my previous post that I would explain how I managed to get Bluetooth working in order to connect to the NXT through Microsoft Robotics Studio. This guide will also allow you to connect to my own .NET NXT interface, which will be released within about two or three weeks depending on my work load with other matters. Sorry for the delay - been busy with uni studies.

This guide aims to describe the procedure I followed to allow you to connect your PC to your NXT and vice versa. This guide does not only apply to the Robotics Studio developed by Microsoft but actually any application you wish to make that needs to communicate through Bluetooth with your NXT. I will assume that you have already installed the Robotics Studio (or other) and relevant SDKs and are using whatever the latest version is. I used the September release.

Helpful links:

http://www.microsoft.com/robotics
http://channel9.msdn.com/wiki/default.aspx/Channel9.MSRoboticsStudio
http://nxtasy.org/

First of all you need to know that there are a few Bluetooth implementations and drivers out there that may or may not actually work within the LEGO software. To list a few: Microsoft, Bluesoleil, and Widcomm (which is now part of Broadcom). The Microsoft Bluetooth generic drivers are installed when you first plug in your USB Bluetooth dongle or turn on your laptop Bluetooth. No matter what I did, I could not get these drivers to work. I later read that the Microsoft Bluetooth driver does not allow any device other than the PC to be the master. For this reason the LEGO software works with no problems because, the PC acts as a master in that scenario, but as soon as you try running the "main" progam on the NXT and the try running a Robotics Studio tutorial, the PC becomes the slave and the driver does not like that. Later I tried the Bluesoleil drivers which came with my USB dongle but once again I could not establish any useful connections.

My success story started when I switched to the Widcomm drivers. I currently use release 1.4.x.x on my PC and in a different attempt I installed version 5.0.x.x on my laptop using the same USB Bluetooth dongle. Both work fine, but the LEGO software does not like either. I tried reinstalling the LEGO software and after installation it told me that Widcomm is not supported. A friend actually managed to get Robotics Studio working as well as the LEGO software using Widcomm drivers. It does not bother me much because I can still use USB with my NXT if I want to use LEGO. Soon I will release my own .NET NXT API instead of using the Robotics Studio. I found Robotics Studio to be much too complicated, with insufficient documentation and very little community support. I talked to a robotics guy from Microsoft and he said they have no intention to make it easier and are aiming for industrial robots.

You should also note that with the NXT brick you can only establish a connection in one direction. The NXT does not support bi-directional communication. As quoted from the Bluetooth SDK: "An NXT is not able to function as both a MASTER and SLAVE device at the same time because this could cause lost data between NXT devices...This has been disabled in the standard LEGO MINDSTORMS NXT firmware."

I will now attempt to replicate the steps I took to get my NXT working with Bluetooth.

0. My test system

Windows XP Pro SP2
NIMBUS USB Dongle (a friend has a Toshiba laptop with bluetooth built in and it works fine)

1. Delete any Bluetooth drivers

This means that you need to Add/Remove any existing Bluetooth drivers you might have installed. When your Bluetooth is plugged in you should just have the Microsoft drivers. If your Bluetooth is unplugged your device manager should have no Bluetooth devices listed.

2. Enable or plug in your Bluetooth device

If not already enabled, enable your bluetooth now. Drivers should be automatically installed if not already installed, and they should be listed as Microsoft drivers. You can check this in the device manager.

3. Download Widcomm drivers and patch

Get yourself a copy of the Widcomm drivers. Versions 1.4.x.x and 5.0.x.x both work. You will need to use your Googling skills. Widcomm drivers do not work unless you have a Widcomm Bluetooth device because of license checking. You will need to use your Googling skill again to find a Widcomm license patcher. There should be a version 1.8. I can't actually tell you where it is because they would not like that.

4. Install Widcomm drivers

Throughout all of the installations your Bluetooth should be ON. Here are some screenshots of the Widcomm driver installation.


During the installation you may get an error message. Just click OK. It does not seem to break anything.


Various Bluetooth services will be installed. Most of them you will never use but they just come with the driver. We will pretty much only be interested in the SPP (
Serial Port Profile). Later, during the installation, you will most likely receive the following message. The reason you get this is because the drivers are only supposed to be used with proper Widcomm devices. So basically the driver is denying your Bluetooth at the moment. Just click OK to continue the installation. The patch you downloaded above will fix this later.


5. Replacing Microsoft with Widcomm

Once installation is complete, you will have a new icon on your desktop, start menu, taskbar and control panel. Your Bluetooth should have been plugged in throughout all of the above. In your device manager you will still have Microsoft drivers. There should be one or more items under "Bluetooth Devices". You are looking for the one that says something like USB Bluetooth Device or USB Radio. Don't touch the devices that are called "Bluetooth Printing Support" or "Microsoft Bluetooth Enumerator" (you may not have such devices listed). Right click on the Bluetooth device and select update driver.

Note: At this stage I had a problem with a popup box that kept coming up and would not let me update the driver. I tried restarting, but I think I had to try starting again from scratch.

When updating your driver make sure you choose "Install from a list or specific location (Advanced)" and in the next step "Don't search. I will choose the driver to install". You should see two items. "Generic Bluetooth Radio" which is the driver you currently have installed and (hopefully) "CSR USB Bluetooth Device". (If you don't see CSR USB Bluetooth device or some sort of Bluetooth device other than the Generic microsoft device then I suggest restart from scratch and wiping all Bluetooth related drivers.) Select the CSR USB Bluetooth Device and click next and let it install. Click yes or ok on anything that may appear.

If successful you should see that your device manager should now only display one item under Bluetooth devices. Check the properties of the device. If its anything other than Widcomm then something went wrong. You migth have selected the wrong driver.


If you see this then you are winning.

6. Patching

At this stage you may wish to reboot. Your Bluetooth taskbar icon should still be purple and will not be able to find any devices unless you are licensed. You can now run the patch. A window will popup and you will need to select the CSR USB Bluetooth Device (or something that looks like Bluetooth). Within seconds (or maybe after a restart) the task bar icon should change from a purple look to a white look.


If you see this then you are up and running.

7. Configure the driver

Now all that's left is to configure your Widcomm Bluetooth driver and your "My Bluetooth Places". If you right click on the taskbar icon you should be able to run the Bluetooth Setup Wizard. You can also turn on your NXT at this stage and enable Bluetooth. I will not explain every single step of the Bluetooth wizard but the important thing is that you enable the Bluetooth serial ports. Here are some screenshots:

Above you can see that all sorts of Bluetooth services are available. If you have enabled your NXT Bluetooth you should be able to detect it already.

You NXT should appear as a serial connection. You can check the COM port in its properties or in the device manager. Note that there are two different COM ports. One will be created for connecting FROM the PC TO the NXT and one will be created for connections FROM the NXT TO the PC. My computer for example uses COM4 to talk to the NXT and the NXT uses COM3 to talk to the PC.


To get to your Bluetooth connections you can just to go My Bluetooth Devices. When you first start a connection to the NXT it will ask you to enter the password on the NXT. For testing just use 1234 and you need to enter that on the PC as well.


On the other hand if you initiate a connection from the NXT to the PC a popup will appear. As long as you keep using the same computer you can select to remember the connection. If you use your NXT with another device, say a mobile phone, you will have to do authentication again. When you go back to the PC you will need to do the authentication again because it will forget the first time you did it. Basically whenever you connect your NXT to different physical devices you will need to authenticate each time. You may also need to clean out your contacts from the NXT Bluetooth menu if you have troubles connecting.


If any sort of connection has been established your tray icon should look like the one below.

You can also use Quick Connect by right clicking on the taskbar icon and selecting Quick Connect > Bluetooth Serial Port > "NXT Name"

8. Enjoy and Play

Some things are obviously fiddly and you will need to play around. You are now ready to attempt your Microsoft Robotics Studio connection again. First you will need to copy the main program and some other files to the NXT using the LEGO software. They are stored in "samples\Platforms\LEGO\NXT\Resources". The files you want to copy to your NXT are main, timeglass, and hands2.

If you open up RoboticsTutorial1 or RoboticsTutorial2 in Visual Studio C# Express Edition 2005 you can just run it, but before you do so you will need to initiate a connection from the NXT to the PC and then start the main progam on the NXT. Once running you will see a Robotics Studio logo fill the NXT screen. While the program is running your Bluetooth taskbar icon should be in the connected state as shown in the picture above. When you connect, it should tell you the COM port that it used. You can also check in device manager to see what port numbers are available. Now you can run your tutorial in Visual Studio. A browser window will popup asking for the COM port and you will need to try all the COM ports if you don't already know which one is the correct one. Some people suggest that it only works with Internet Explorer but for me it seemed to work fine in Firefox. If everything is successful the NXT should beep and the console window on the PC should show a success message with no red writing at all. If you see any red text then something has gone wrong, and it means that you will usually need to stop the program, restart the NXT, reconnect, run main again, run the tutorial again and try another COM port. If successful, the bumper should show a message on the console when pressed.

Hopefully I have been able to help out a bit. I spent many hours trying to get it all working. I don't guarantee that it will work just by following my guide. At least I hope you will be able to get Bluetooth working or get onto the right track. If everything went well you should have no problems creating connections from the PC to the NXT and from the NXT to the PC. If you only use one computer then it should never ask you the password again and everything should just connect with minimum fuss in either directions. Just note again that you can't connect in both directions at once.

If you find the My Bluetooth Places icon annoying and want to remove it from your desktop the see this page here:

http://translocator.ws/2005/10/23/removing-the-Bluetooth-desktop-icon

In my Bluetooth journeys I also had trouble with it disabling my speakers. I ended up totally reinstalling my Windows XP but someone on the above mentioned page actually said the following:
Sotiris Says:
September 15th, 2006 at 11:24 am
Sometimes when somenone setup a Bluetooth (for example trust Bluetooth 2) the sound card is not working anymore so go to–> start/control panel/Administrative Tools/Computer Management/Device Manager/Sound, video and gamecontrollers/Bluetooth Audio/properties/Do not use this device (disable)/OK and u have ur sound back

I think I have covered everything I wanted to. I did not go into extreme details with the Robotics Studio because I believe it is much too complicated and I have not pursued it as a possible solution any further. I am in the process of writing a .NET interface for the NXT and you will be able to control the NXT from your PC without having to run any program on your NXT. Assuming you have previously authenticated your NXT with the PC, any further connections from my API will be done automatically and transparently. I may post a sneak preview soon.

Until then, over and out!

Tuesday, September 19, 2006

Received My NXT

Hello NXT roboters!

I received my NXT in August 2006 and started playing around. Immediately my girl friend gave it a name, as they do, so my NXT has been dubbed "Connie". The silly thing is that we cant remember where that came from in the first place!! Maybe I will remember later. Say hello to my dog Cody too.


Cody, NXT box and my car


NXT Box and my custom made car

I started this blog because I wanted to keep a history of the troubles and solutions I had throughout my experimentation with my NXT. The biggest problems occured with Bluetooth and then trying to get Microsoft Robotics Studio to connect. At the time of writing I still havent managed to get the Robotics Studio to connect using the tutorials!!

I hope I will be able to help others getting closer to getting this thing working.

Enjoy!